














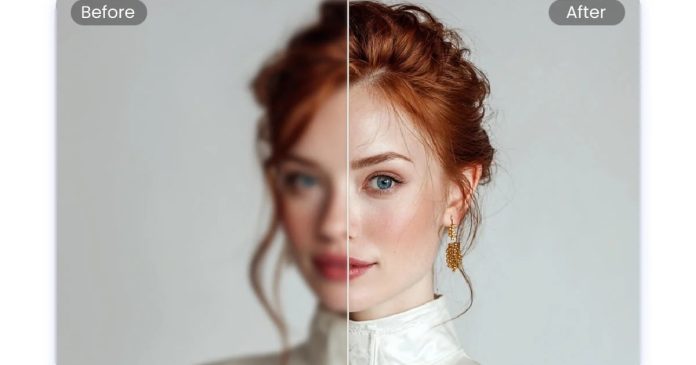
In 2026, you can bring your photos back to life in just a few clicks with the help of an AI photo enhancer. It helps you increase the quality of an image, especially the blurry ones that you wouldn’t have been able to fix otherwise.
In this guide, I’ll show you how to use an AI photo enhancer, explain how it works, and even suggest some tools you can try right now.
What is an AI Photo Enhancer?
An AI photo enhancer is an intelligent tool that automatically improves image quality by increasing resolution, reducing noise, and sharpening details.
Unlike manual photo editing, where you tweak each slider individually, AI photo enhancers rely on trained models that “understand” how images should look, allowing them to restore or improve images in seconds.
What Are The Key Features of AI Photo Enhancers?
Features of AI Photo enhancers that make it do good things:
- Upscaling resolution to increase the size while keeping or adding detail
- Noise removal to remove grain and speckles
- Sharpening and clarifying edges along with fine lines
- Colour and light correction to adjust brightness, contrast, and saturation
- Artefact cleanup to fix JPEG compression glitches
- Batch processing to enhance many photos at once
- Face or detail restoration, special models for faces, hair, textures
- Selective enhancement to only touch certain areas, like the background or subject
These features vary by tool, but most good ones combine several of these to improve your photo.

What Are The Benefits of Using a Photo Enhancer?
Why should you use one? Here are some real advantages:
- Saves time: no manual editing; the tool does the hard work
- Better image quality: sharper, cleaner, ready for use or printing
- Rescues imperfect photos: things you would have thrown away can often be usable
- Easy for everyone: no need to be an expert photographer
- Consistent results: your set of photos stays in the same style
- Better visuals: for web / social media/e-commerce
In Pakistan, for social media pages, wedding photography, or small business product photos, having crisp images matters a lot. AI tools make that possible even if you don’t have a big budget.
How AI Photo Enhancers Make Your Photos Clear?
This is how most AI photo enhancers operate, from start to finish.
Step 1: Upload Your Blurry Photo
Typically, you begin by uploading the image you want to enhance. This could be:
- A low-resolution thumbnail
- A blurred or slightly out-of-focus shot
- An old scanned photo
- A noisy nighttime capture
Most tools support common image formats such as JPEG, PNG, TIFF, or RAW. The upload might be through a web interface or a desktop/mobile app.
Step 2: Just Wait
Once your image is uploaded, the AI does its work. This is the “magic” step:
- The model breaks down the image into patches, looks at textures, colours, edges, and other contextual cues.
- It estimates which pixels need adjustment, where detail is missing or distorted, and how to best sharpen or reconstruct them.
- It applies enhancements, combining denoising, upscaling, sharpening, and colour correction in one pass (or multiple internal passes).
- In more advanced tools, you might get options or presets (e.g. “Portrait,” “Landscape,” “Low Light”) to guide the enhancements.
Depending on the tool and your image’s size, waiting might take a few seconds to a minute.
Step 3: Preview and Download
After processing:
- The tool shows you a preview (often side-by-side: before/after).
- You can compare results, zoom in to see restored detail, or toggle enhancement strength (if supported).
- When satisfied, you can download the enhanced version in high resolution.
- Some tools also let you select output parameters (format, file size, compression settings, etc.).
And voilà, a clear, sharper image is ready for use.
Which Types of Pictures Can AI Photo Enhancers Work With?
AI photo enhancers have come a long way, and many types of images can benefit. However, results can vary based on the content, resolution, and quality of the original.
Good Candidates
- Portraits: Faces, skin, hair details
- Landscapes/nature: Trees, skies, textures
- Product shots: For online stores
- Scanned old photos: Faded, scratched, worn ones
- Low-light images: Image noise removal
- Graphics/text images: To clarify text
What Is Hard to Fix?
- Very heavy blur or no detail left
- Complex motion blur
- Extreme compression or artefacts
- Parts of the image with missing data (you can’t restore what was never captured)
In practice, many everyday imperfect images can be improved a lot with AI.
Which Are The Best AI Photo Enhancer Tools to Make Photos Clear Again?
Here’s a selection of well-regarded options, along with their strengths:
| Tool Highlight on Conclusion | |
|---|---|
One may not understand the importance of an AI enhancer until they have the best image with just a slight flaw and can’t retake the image, so instead an AI enhancer comes in handy, and as a cherry on top, can make your photos look professional without needing expert editing skills.
Stay tuned to Brandsynario for latest news and updates


 Join a Channel
 Brandsynario
 Veryfilmi